Please refer to your initial welcome notice for specific examples.
General access information is as follows:
Server Configuration Settings:
As with all passwords, for best security practices, you should change your password periodically.
Passwords must meet complexity rules to be accepted. This is a security precaution to prevent less desirable elements being able to easily access your personal information.
Passwords must contain at least 8 characters, including at least 3 of the following: English uppercase characters; English lowercase characters;numerals (0-9); and non-alphabetic characters (such as !, #, $, %). Please avoid using characters from your Account Name (e.g., user@domain.com), Full Name, Initials, or Display Name.
To change your password, log into the User Control Panel, and perform the following steps:
- Under Change Password, enter Current Password.
- Enter New Password.
- Enter the same password as Confirm New Password.
- Click the Change button.
Note: After changing the password, you will need to change it in your email client software (, e.g., Outlook, Entourage) before you will be able to use it to access your email again. The new password will also be used to log into OWA.
Hosted Exchange users can access email and data any time, from any Internet-connected computer, via Outlook Web Access (OWA). OWA allows you to access your personal contact list, email folders, calendars, and public folders.
There are two versions of OWA: Premium and Light. Premium is available whenever you log in using Internet Explorer 6 or higher. Light provides fewer features (e.g., no access to public folders, no HTML composing, no access to other user mailboxes, no notifications/reminders, etc.) than Premium, but it works with most other browsers, including Firefox and those on Mac and Linux machines.
To log into OWA, go to:
outlook.emailsrvr.com or such server that has been defined to you n your welcome email.
Each identified user account user can log into OWA using their email address and password.
To get instructions on OWA features, click the Help link in the upper right corner of the OWA screen.
Note that
OWA access may time out automatically after 60 minutes.
For the proper interaction of Outlook 2007/2010 with Nexus' Hosted Exchange 2010 Email service, you should set up an AutoDiscover domain record in your DNS records.
Ideally, this record should be a DNS 'CNAME' entry to autodiscover.emailsrvr.com. If for some reason, this is not possible, a direct IP reference ('A' record) pointing to 207.97.200.61 is required.
DNS resolution may take up to 72 hours to complete. It is important to ensure that DNS resoution takes place before continuing to configure your email services on your equipment. Failure to have proper DNS resolution can lead to unexpected, and/or indeterminate results.
The supported versions of client software are
- Outlook 2007/2010 (Windows)
- Outlook 2011 (Mac)
- IOS 5 - Apple Ipad/Iphone
Outlook 2003, and versions of Entourage prior to 2011 are known to have incompatilities with our Exchange 2010 platform. Please note - we do not provide support for any other levels of software for direct integration. Standard POP3/SMTP support is still available for other clients, however they will not be supported for integration with the more advanced features of Exchange.
Once the DNS entries for AutoDiscover have been applied to your DNS servers by Nexus' support staff, or your own hosting company, if you host your DNS elsewhere, and you know them to be resolving properly, you can begin configuration of your desktop client.
Though we encourage customers to use Autodiscover to set up Outlook, some customers may prefer to download and run a personalized PRF file.
To locate the customized PRF file, each user will need to log into the User Control Panel, using their email address and password.
- If you are running Outlook, be sure to close it. After closing Outlook, press Ctrl + Alt + Delete and launch your Windows Task Manager. If you see outlook.exe in the list, select it and click the End Task button. This ensures that Outlook is not running, since sometimes third-party Outlook plug-ins do not shut down properly.
- Log into the User Control Panel, using your email address and password.
- Click the Download Your Outlook Profile link. This link is roughly 1/2 way down the menu system.
- Click the Save button and save the file to your C: drive. Do not attempt to process the PRF file as it downloads - you want to be sure you have a full PRF file downloaded before importing it into Outlook.
- Click the Windows Start button, and select Run.
- Type the following in the command line:
outlook.exe /importPRF c:\<username>.prf
You will need to replace "c:\<username>.prf" with the exact path and name of the .prf file you downloaded above.
- Click the OK button.
- Outlook will launch automatically. You may encounter a warning popup window. Click the Yes button. (Running the PRF configuration file will not delete any of your existing email or your profiles.)
- When prompted, enter your username and password, as provided by your administrator. Your username can be obtained from the User Control Panel. You may need to enter your username and password more than once throughout this process, as Outlook sets up your mailbox for the first time.
- Click the OK button. You will now have full access to your mailbox through Outlook. Though you’ll be prompted twice for your email address and password information during this initial setup, future logins should only require you to enter than information one time.
Once the DNS entries for AutoDiscover have been applied to your DNS servers by Nexus' support staff, or your own hosting company, if you host your DNS elsewhere, and you know them to be resolving properly, you can begin configuration of your desktop client through AutoDiscover. We recommend setting up a new profile for use with Hosted Exchange.
- Click the Windows Start Button, and Select Control Panel, and then the Mail Icon
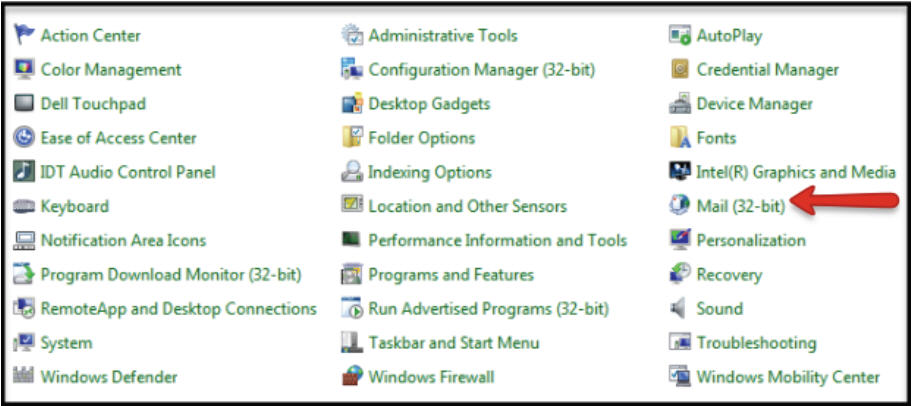
Note: Depending on what version of Windows you are running, you may need to switch to Classic View to find the Mail Icon, or it may (or may not) state "32 Bit".
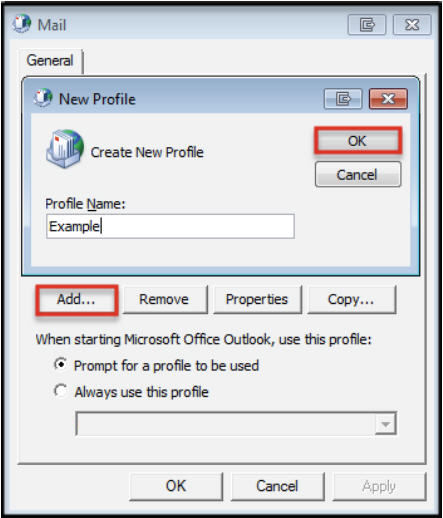
- Select the Show Profiles button, click the Add button, and enter in a name for your new profile, and click the OK button.
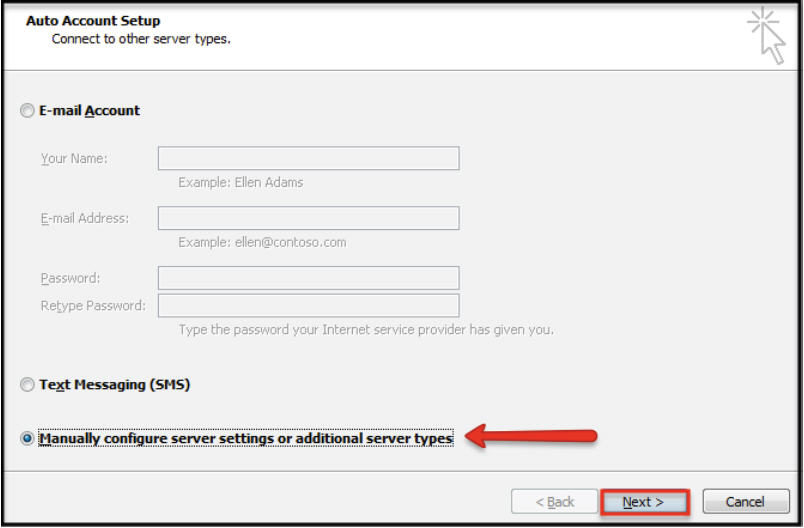
- Select Manually configure server settings or additional server types checkbox, and click Next button
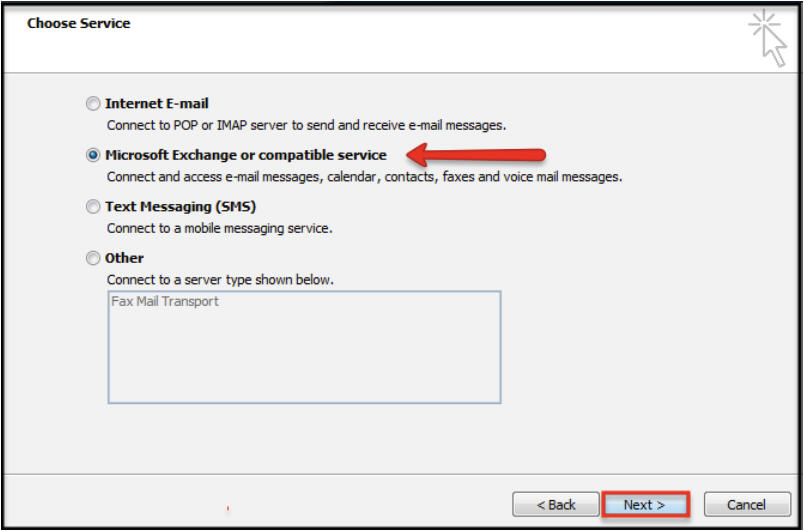
- Select the Microsoft Exchange option, and click the Next button
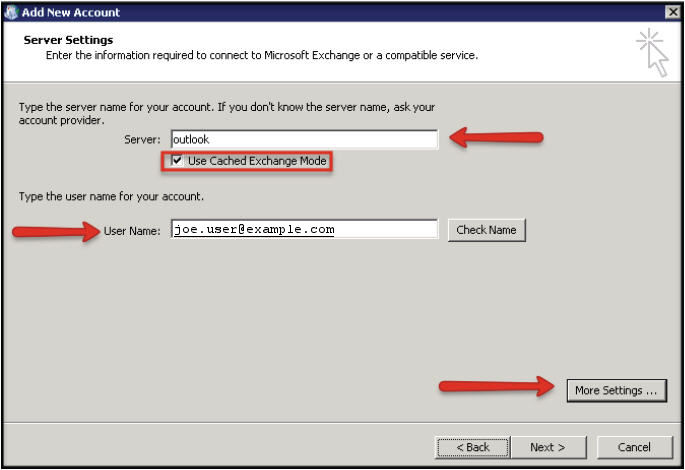
- Enter "outlook" as the server address field, and then select "Use Cached Exchange Mode" checkbox. In the User Name field, enter your entire email address and select "More Settings".
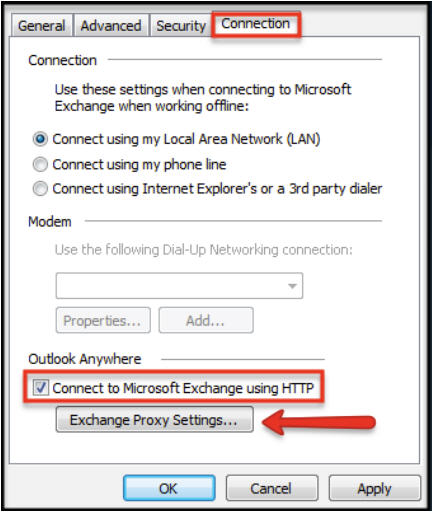
- Next select the Connections tab, select the Connect to Microsoft Exchange using HTTP checkbox, and select the Exchange Proxy settings button
- Next, enter in "connect.emailsrvr.com" in the Proxy Server address. Select both the On fast networks... and On slow networks... checkboxes, and under Proxy authentication, select Basic Authentication
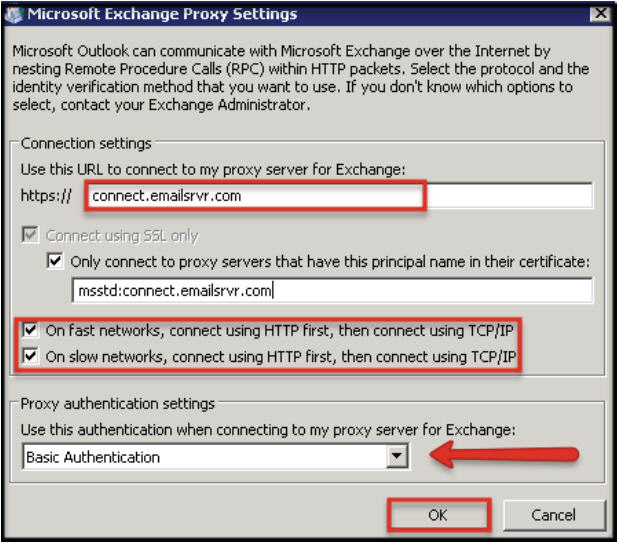
- Click OK, Apply, OK again, and then Select the "Check Name" box in the Connect windows, enter in your password and select the OK button.
Note: You may receive a pop-up asking you to select your mailbox from a list. Select your mailbox and click the OK button.
If you have other questions, feel free to contact support. We're here to help.
|

